Life is Short Do More

All posts in one long list


Distributed Tracing

Distributed tracing:

- It is hard to locate the issue when something goes wrong in distributed microservice system as the services are distributed across multiple servers in different location, so traditional monitoring method like logs and metrics are no longer enough to understand where the fault is.
- Distributed tracing enables visibility of how request flows into the system by collecting the information such as time taken at each step , errors, failures etc.

Components of Distributed tracing:

- Trace: Request from source to destination having different service hops in between. Traces are made up of spans.
- Span: A Single operation within a service. A service can have multiple spans. Primary building block of a trace. 
- Context: Passing context between different components or service in a distributed system.
- Instrumentation: Instrumentation library is component that developers integrate into their applications to generate, collect and manage trace data.
- Data Store: Typically storage system that stores trace data. Eg. Elasticsearch, Cassandra, Jaeger
- Visualization: Graphical representation of the trace data. Eg. Kibana, Jaeger UI

How does distributed tracing work?

- Trace-id gets attached to an incoming request to the system. This identifies the request during its lifespan within the system.
- For every Child Span their is a Parent Span id associated.
- While the request flows in the system instrumentation library keeps on adding context data such as start time, end time, and metadata about each operation (span). 
- Trace data gets stored and then is visualized.

Elasticsearch Components

What are the components of ELK Stack?

- E=? Elasticsearch. 
- It is distributed store, search and analytics engine based on Apache lucene. Elasticsearch is where indexing, search and analytics happens. 

- L=? Logstash.
- Collects, aggregates, enrich and ships data to elasticsearch.

- K=? Kibana.
- With Kibana one can explore, visualize the data in elasticsearch.

- There are few more components that can send data to elasticsearch - Beats, APM, external services.

- There are different kind of beats shipper, for eg. filebeat, metricbeat, packetbeat, winlogbeat etc.
- Beats=? For eg. Filebeat can collect data from files in distributed serevrs and send data to the logstash or directly to elasticsearch.

- APM=? Application Performane Monitoring. Capture and analyze distributed transactions in distributed system and sends the captured trace data to elasticsearch.

- External services=? can send data directly to elasticsearch using elasticsearch api end points.

Elasticsearch Architecture

Elasticsearch Architecture

- An elasticsearch cluster is made up of number of nodes.
- Each node is nothing but an instance of elasticsearch.
- The data in elasticsearch is stored in index, you can compare it as database in relational database.
- The index can have any limit of data but this can create problem while operation as the index is large.
- Now, to deal with this situation a shard needs to be created as a unit of data that represents a subset of a larger index. There can be more than one shard for an index.
- Shard contains data represented as documents. 
- Documents can be compared with rows in relational database.

Elasticsearch at a glance

What?

 - ElasticSearch is a search engine (lucene based )
 - Which stores JSON data (using the inverse index data structure) 
 - Processes it
 - Supports full text based search using REST APIs

Why?

How?

 - A document is like a row in a relational database, representing a given entity — the thing you’re searching for. 
 For example, a document can represent an encyclopedia article or log entries from a web server.   
 - An index is a collection of documents that have similar characteristics.
 - An index in Elasticsearch is actually what’s called an inverted index.
 - Instead of searching the text directly it searches the index.
 - An inverted index lists every unique word that appears in any text being searched and identifies all of the saved document for each word occur. 
 - The term “name” occurs in document A and B, so it is mapped to that document.

Error Handling in Golang

What is error handling in golang

Software will contain errors and scenarios that are not accounted for. Error handling is an important part of programming robust, reliable, and maintainable code.
Go offers an interesting approach to errors(a type in the language):
	Errors may be passed around functions and methods
Handling errors is part of creating robust, reliable, & trustworthy code
Calling a method or function that could fail, one of Go’s conventions is to return an error type as its final value

Generally no exception will be thrown within a function if something goes wrong it is up to the caller to decide what to do with the error

UNDERSTANDING THE ERROR TYPE

In Go, an error is a value
The standard library declares the error interface as follows:

	type error interface {
    	Error() string

This features a single method called Error that returns a string

Creating error object

package main
import (
	"errors"
	"fmt"
)
func main() {
	err := errors.New("Something went wrong")
	if err != nil {
		fmt.Println(err)
	}
}

An error is created using the New method from the errors package
An if statement checks whether the error value was not nil
If the value is found to not be nil, it is printed

DON’T PANIC

Panic - built-in function in Go - stops ordinary flow of control, begins panicking, halting the execution of the program
Bad idea to use this, as execution stops without any alternative
Below example demonstrates how panic is a hard stop
	package main
	import (
	    "fmt"
	)
	func main() {
	    fmt.Println("This is executed")
	    panic("Oh no. I can do no more. Goodbye.")
	    fmt.Println("This is not executed")
	}

Two Factor Authentication

2 Factor Authentication

2FA adds an extra layer of account protection by requiring two types of authentication. 
This can be something a user knows, like a password, and something the user has, like a phone(one-time passwords), inherence factors are things that the user is, typically a biometric characteristic such as a fingerprint or an iris pattern.

TOTP

Time-based One-Time Passwords(TOTP) is a common form of MFA specifically based on 2 Factor Authentication. TOTP Algorithm uses current time(device or server time) and shared key as input.

How TOTP works?

The inputs include a shared secret key and the system time.
Neither the inputs nor the calculation require internet connectivity to generate or verify a token. Diagram below shows this:
You can notice that the secret key and the time both at server end as well as user's end is same. And gives the passcode here for eg."343267" is same at user's as well as server's end.

Fork vs Exec System call

What is Fork System Call?

When a new process is created by making an exact copy of itself it is fork. As this is the exact copy the environment remains same as that of parent process with the only difference is pid.

What is Exec System Call?

The exec system call replaces the current process image with the new process image. We can also say that after the fork process, the address space of the child process is overwritten with the new process data.

Fork and Exec System call together?

The fork-and-exec switches the process with each other as in the following example:
Have a look on the process they are same in case of fork and different incase of exec. Also the PID is different in case of fork and same incase of exec.

Zombie vs Orphan process

What is process and how it is reaped when dead?

In computing, a process is an instance of a computer program that is being executed.
A process notifies its parent process once it has completed its execution and has exited. Then the parent process would remove the process from process table.

What is a Zombie process?

Also known as “defunct” or “dead” process – In simple words, a Zombie process is one that is dead but it is present in the system’s process table. If the parent process is unable to read the process status from its child (the completed process), it won’t be able to remove the process from memory and thus the process being dead still continues to exist in the process table.

The following command can be used to find zombie processes:
$ ps aux | egrep "Z|defunct"

To remove Zombie process entry from process table, what can be done is to notify its parent process explicitly to remove the  entry. This can be done by sending a SIGCHLD signal to the parent process. 

The following command can be used to find the parent process ID (PID):
$ ps -o ppid= <child pid>

Once you have the Zombie’s parent process ID, you can use the following command to send a SIGCHLD signal to the parent process:

$ kill -s SIGCHLD <parent pid>

If this does not help t delete entry ofZombie process, you will have to kill. The following command can be used to kill its parent process:

$ kill -9 <parent pid>

What is an Orphan process?

An orphan process is a running process whose parent process has finished or terminated.A process can be intentionally orphaned just to keep it running.

Any orphaned process will be immediately adopted by the special init system process. This operation is called re-parenting and occurs automatically.

Even though technically the orphan process has the init process as its parent, it is still called an orphan process since the process that originally created it no longer exists.

Finding a Orphan Process:
It’s very easy to spot a Orphan process. Orphan process is a user process, which is having init (process id – 1) as parent. You can use this command in linux to find the Orphan processes.

$ ps -elf | head -1; ps -elf | awk '{if ($5 == 1 && $3 != "root") {print $0}}' | head
This will show you all the orphan processes running in your system. The output from this command confirms that they are Orphan processes, i.e. the process couldbe intentionally orphaned, so confirm from some other source also before killing them.

Killing a Orphan Process:
As orphaned processes waste server resources, so it’s not advised to have lots of orphan processes running into the system. To kill a orphan process is same as killing a normal process. gracefuly using -15 (term)

$ kill -15 <pid>
If that don’t work then simply use
$ kill -9 <pid>

Querying Dremio using Golang and ODBC driver

Dremio can be accessed via golang or other programming language. Here we are moving ahead by having two docker containers one of dremio and other of the database postgres.
To access it via code or isql you need to have Dremio odbc Driver and unixODBC driver installed as we are in Linux environment (For windos it is not required).

And that is it. Let follow the steps below.

Prerequisites:

Docker installed

Run postgres and dremio container

Postgres:
docker run --name some-postgres -p 5432:5432 -e POSTGRES_PASSWORD=mysecretpassword -d postgres

Dremio:
docker run -d -p 9047:9047 -p 31010:31010 -p 45678:45678 dremio/dremio-oss

Configure dremio to get the postgress data

* Go to http://127.0.0.1/9047 to access dremio
* Create account in dremio by providing the details, and do remember username and password.
* Go to → add source → select postgres → provide the required details
* To get postgres ip you can go inside the container and do cat /etc/hosts and you can find the ip
Login Details
Once connected follow the steps below.

Install Dremio odbc driver

$ wget https://download.dremio.com/odbc-driver/1.4.2.1003/dremio-odbc-1.4.2.1003-1.x86_64.rpm
$ sudo yum localinstall dremio-odbc-1.4.2.1003-1.x86_64.rpm

Install go

$ wget https://dl.google.com/go/go1.13.linux-amd64.tar.gz
$ sudo tar -C /usr/local -xzf go1.13.linux-amd64.tar.gz
$ vi ~/.bash_profile
	export PATH=$PATH:/usr/local/go/bin
$ source ~/.bash_profile 

Setting up odbc.ini and odbcinst.ini file

Copy and Paste the below file to your odbc.ini file and odbcinst.ini respectively. You can find the location of ini file by the following command:

$ odbcinst -j

$ sudo vi /etc/odbc.ini
		[ODBC Data Sources]
		DREMIO=Dremio ODBC Driver 64-bit

		[DREMIO]
		Description=Dremio ODBC Driver (64-bit) DSN
		Driver=/opt/dremio-odbc/lib64/libdrillodbc_sb64.so
		ConnectionType=Direct
		HOST=192.168.1.4
		PORT=31010
		DATABASE=mydb
		ZKQuorum=
		ZKClusterID=
		AuthenticationType=Plain
		DelegationUID=
		AdvancedProperties=CastAnyToVarchar=true;HandshakeTimeout=5;QueryTimeout=180;TimestampTZDisplayTimezone=utc;NumberOfPrefetchBuffers=5;
		Catalog=DREMIO
		Schema=
		SSL=0
		DisableHostVerification=0
		DisableCertificateVerification=0
		TrustedCerts=/opt/dremio-odbc/lib64/cacerts.pem
		UseSystemTrustStore=0
		UseExactTLSProtocolVersion=0
		Min_TLS=
		TLSProtocol=

$ sudo vi /etc/odbcinst.ini
		[Dremio ODBC Driver 64-bit]
		Description=Dremio ODBC Driver(64-bit)
		Driver=/opt/dremio-odbc/lib64/libdrillodbc_sb64.so
		UsageCount=1

Install unixODBC driver

$ wget ftp://ftp.unixodbc.org/pub/unixODBC/unixODBC-2.3.7.tar.gz
$ gunzip unixODBC-2.3.7.tar.gz
$ tar xvf unixODBC*.tar
$ cd unixODBC-2.3.7/
$ ./configure  --prefix=/usr/local/unixODBC
$ make
$ sudo make install
$ export CGO_CFLAGS="-I/usr/local/unixODBC/include"
$ export CGO_LDFLAGS="-L/usr/local/unixODBC/lib"
$ go get github.com/alexbrainman/odbc
$ go run test.go
		package main
		import (
		_ "github.com/alexbrainman/odbc"
		"database/sql"
		"log"
		"fmt"
		)
		func main() {
		    var (
		        ID   int
		        NAME string
			   AGE int
			   ADDRESS string
			   SALARY float64
		    )
		    db, err := sql.Open("odbc","DSN=Dremio;UID=<dremio login username>;PWD=<dremio password>")
		    if err != nil {
		                log.Fatal(err)
		    }
		    rows, err := db.Query("SELECT * from test.company")
		    if err != nil {
		            log.Fatal(err)
		    }
		    if err != nil {
		        fmt.Println("Unable to Query :( ", err)
		    }
		    defer rows.Close()
		    for rows.Next() {
		        err := rows.Scan(&ID,&NAME,&AGE,&ADDRESS,&SALARY )
		        if err != nil {
		            fmt.Println("Error when parsing :( ", err)
		        }
		 
		        fmt.Println(ID, NAME, AGE, ADDRESS, SALARY)
		    }
		    err = rows.Err()
		    if err != nil {
		        fmt.Println(err)
		    }
			defer db.Close()
		}

CI/CD pipeline with Jenkins, docker and kubernetes

Setup Jenkins server

$ mkdir jenkins
$ cd jenkins
$ vim Vagrantfile

Vagrant.configure("2") do |config|
  config.vm.box = "bento/ubuntu-20.04"
  config.vm.network "forwarded_port", guest: 8080, host: 8081, host_ip: "127.0.0.1"
  config.vm.network "private_network", ip: "192.168.10.31"

  config.vm.provision "shell", inline: <<-SHELL
    sudo apt-get update
    sudo apt-get -y upgrade
    sudo apt install openjdk-11-jdk -y  
    wget -q -O - https://pkg.jenkins.io/debian-stable/jenkins.io.key | sudo apt-key add -
    echo "deb https://pkg.jenkins.io/debian-stable binary/" | sudo tee -a  /etc/apt/sources.list > /dev/null
    sudo apt-get update
    sudo apt-get install -y jenkins
  SHELL
end

$ vagrant up
$ vagrabt ssh

Setup Repository for docker

$ sudo apt-get update \
$ sudo apt-get install \
    apt-transport-https \
    ca-certificates \
    curl \
    gnupg-agent \
    software-properties-common


$ curl -fsSL https://download.docker.com/linux/ubuntu/gpg | sudo apt-key add -
$ sudo apt-key fingerprint 0EBFCD88

$ sudo add-apt-repository \
   "deb [arch=amd64] https://download.docker.com/linux/ubuntu \
   $(lsb_release -cs) \
   stable"

Install docker engine

$ sudo apt-get update
$ sudo apt-get install docker-ce docker-ce-cli containerd.io

updated user jenkins to run docker

$ sudo usermod -G docker jenkins	
$ sudo apt-get install acl

$ sudo setfacl -m user:jenkins:rw /var/run/docker.sock

Setup Kubernetes

$ curl -LO https://storage.googleapis.com/kubernetes-release/release/`curl -s https://storage.googleapis.com/kubernetes-release/release/stable.txt`/bin/linux/amd64/kubectl

$ chmod +x ./kubectl
$ sudo mv ./kubectl /usr/local/bin/kubectl

$ cp -r ~/.kube /var/lib/jenkins/
$ sudo chown -R jenkins:jenkins /var/lib/jenkins/
$ vim /var/lib/jenkins/.kube/config

		apiVersion: v1
		clusters:
		- cluster:
		    certificate-authority: /var/lib/jenkins/.minikube/ca.crt
		    server: https://192.168.99.100:8443
		  name: minikube
		contexts:
		- context:
		    cluster: minikube
		    user: minikube
		  name: minikube
		current-context: minikube
		kind: Config
		preferences: {}
		users:
		- name: minikube
		  user:
		    client-certificate: /var/lib/jenkins/.minikube/profiles/minikube/client.crt
		    client-key: /var/lib/jenkins/.minikube/profiles/minikube/client.key


❖ make sure the permission of the following files should be as follows
	➢ client.crt 644, 
	➢ client.key 600, 
	➢ ca.crt 644


$ Adding docker hub credentials in jenkins
Credentials → System → Global Credentials → Add Credentials
Login Details

Job → Pipeline → Poll SCM(after every push it will auto build the job)

Poll Scm
❖ Add the groovy script
	➢ either via copy
	➢ or via SCM
❖ Apply → Save → Build
❖ Test on command line
	➢ kubectl get svc
	➢ https://192.168.10.30:<< port >>/hello/deepak

The groovy script:

pipeline {
   agent any
   environment {
       dockerHub = "docker.io"
       docker_cred = 'dockerhub'
   }
   stages {
		stage('SCM Checkout'){
			steps{
				checkout([$class: 'GitSCM',branches: [[name: 'origin/master']],extensions: [[$class: 'WipeWorkspace']],userRemoteConfigs: [[url: 'https://github.com/agrawalpoonam/python-app.git']]  ])
			}
		}
		stage("Build Docker Image"){
			steps{
				sh 'pwd'
				sh "docker build -t poonamag/test-app . --no-cache"
			}
		}
		stage('Upload Image to DockerHub'){
			steps{ 
	     	    withCredentials([
     		 	[$class: 'UsernamePasswordMultiBinding', credentialsId: docker_cred, usernameVariable: 'dockeruser', passwordVariable: 'dockerpass'],
  				]){
					sh "docker login -u ${dockeruser} -p ${dockerpass} ${dockerHub}"
  				}
	    	  	sh 'docker push poonamag/test-app'
	    	 }
	  	}
		stage("Running Docker Image"){
			steps{
				sh "kubectl get namespaces"
				sh "kubectl apply -f deployment.yaml"
			}
		}
}
}

RSA algorithm (asymmetric algorithm)

What is RSA algorithm?

RSA(Rivest–Shamir–Adleman) is an algorithm to encrypt and decrypt messages. It is an asymmetric cryptographic algorithm. There is a pair of public, private key and algorithm, the message is encrypted with the shared public key of receiver and decrypted by the private key of the receiver.

Example:

-   EncryptionKey => (5,14)
    Suppose a text to be encrypted is letter 'B' ->  2, then  2^5(mod 14)
    = 32(mod 14) = 4 (cyphertext). Where (e,N) that is 2^e(mod N) => (5,14)
    is encryption key


    DecriptionKey: (11, 14),
    4^11(mod 14) => 2 == B, where (d,N) that is 4^d(mod N) => (11, 14) is
    decription key

-   How does it work, what is the algoritm? There is no magic it is just
    simple mathematics:
    Take two prime numbers (numbers can be hundreds & hundreds digit long),
    I choose small number (for better explanation) (2,7) where p = 2, q = 7
    -   N = p * q => N = 14

    -   choose φ(N) = (p-1)(q-1)

    -   Now choose a number for encryption e where
        { 1 < e < φ(N) and coprime with N and φ(N)}
        1 < e < 6 =  2, 3, 4, 5
        number which is coprime with 14 and 6 is 5
        so our lock is (e,N) = (5,14)

    -   Now for decryption we choose d such that {d.e(mod φ(N))}
        that is -> d.5(mod 6) = 1
        the options could be -> 1.5(mod 6), 2.5(mod 6), 3.5(mod 6),
        4.5(mod 6),5.5(mod 6), 6.5(mod 6), 7.5(mod 6), 8.5(mod 6),
        9.5(mod 6), 10.5(mod 6), 11.5(mod 6), 12.5(mod 6) and so on ...

        I choose d = 11 that is 11.5(mod 6) which gives me the value 1.
        So the key is (11, 14)

Transactional System Administration Vs Service Centric Model in SRE

What is Transactional System Administration?

Think of it as a scenario between Customer and SysAdmin:
- Customer : Would you do xyz task?
- SysAdmin : Yes, Done!
- Customer verifies. 
This is a typical transaction system. The best example is ticket system.

Why is it Bad?

- It is a reactive process as the SysAdmin has to do job in a limited time frame which creates pressure over them.
- It discourages the long term planning, for eg. Nobody comes and says I am working on service and will need this machine configuration in future. As a result there are emergency hacks and outages. Operations is an afterthought.
- No automation for optimization and prioritization of the requests.
- Customer considers SRE as "servant" and SRE thinks customer as "ever demanding child". Both of these is bad.
- There is only one way to scale i.e. hire more people!
- Users hate to open tickets for every task and hang on it.
The whole ticket system is creating a pressured environment for SREs , lets call it as "Push" mechanism is working here.

How did we reach here?

Have we really, ever gave a thought that do we really need Ticket System?  
Actually No! It's not required.
But then you need a way to track your work, right!

Some of the ways that different organizations has adopted.

1) Baseline- Convert “Push” -> “Collaboration”

How? There are 2 ways: 
- Put one SRE member in different development team's Agile meetings.
- Put each team lead of different development team's in SRE Agile meetings.
	> Another version could be SRE communicating with all stakeholders of the product not just developers.
Both of the above points gives a single solution by solving Administartion related problems in Dev teams. Isn't it? 
SRE memebers become aware of their problems in the meetings and can solve them.
Dev teams can also use SRE chat rooms for their issues.

2) Baseline- Convert “Push” -> “Automations”

Some eg:
- Automating compilation and build process in CI/CD for developers to do on their own. Click or give some APIs and it's done.
- Auotmate load balance to point at service replicas.
- Automate VM creation.
- Laptop distribution: For new employees we should maintain laptop distribution system as-
		> SRE tracks HR DB for new employee, Emails when eligible and creates a portal for ordering machines.
		> Automates OS installation for use by laptop delivery crew.
		> Does capacity planning generates purchase orders etc for purchasing  and finance group.
Here we try to automate as much as possible for users to get the task done by automations instead of killing SRE's time. This also keeps motivation of SRE high.

3) Baseline- Convert “Push” -> “Pull”

Use Kanban boards, some good eg are:
- Trello board
- Learnkit.com
- Assign 3 task per person in action per week. You pull 3 tasks through system per week.
This way everyone could prioritize their tasks. It's upto the product management to decide in case of high loads whether prioritize the tasks or hire more people.

Some References: Reference

Load average in cpu

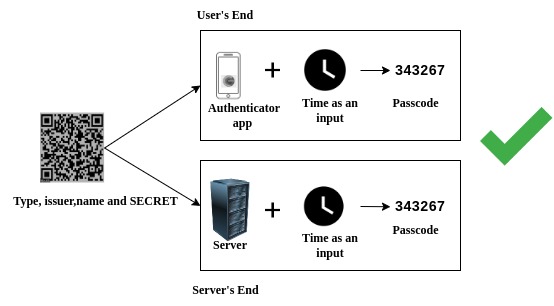
Understanding CPU load Average On the basis of following variables:

- CPU cores.

- CPU load average.

- CPU load average on the basis of number of CPU.

CPU Cores

  • We can check the number of cpu cores by one of the following commands: $ nproc 4

OR lscpu

$ grep ‘model name’ /proc/cpuinfo | wc -l 4

CPU load average

  • We can check load on the cpu with the following commands: $ cat /proc/loadavg

2.48 1.69 1.42 5/889 10570

$ cat /proc/loadavg

2.48 1.69 1.42 5/889 10570 top - 00:07:16 up 5:36, 1 user, load average: 0.86, 0.78, 0.77 Tasks: 312 total, 1 running, 256 sleeping, 0 stopped, 0 zombie %Cpu(s): 2.7 us, 0.8 sy, 0.0 ni, 96.6 id, 0.0 wa, 0.0 hi, 0.0 si, 0.0 st KiB Mem : 8033996 total, 1619612 free, 3388332 used, 3026052 buff/cache KiB Swap: 2097148 total, 2097148 free, 0 used. 3859444 avail Mem

PID USER PR NI VIRT RES SHR S %CPU %MEM TIME+ COMMAND
3059 poonam 20 0 3839156 223956 74324 S 3.3 2.8 2:53.46 gnome-shell
2913 poonam 20 0 399424 85528 58908 S 3.0 1.1 1:38.02 Xorg
9269 poonam 20 0 679612 56704 34448 S 2.0 0.7 0:01.05 terminator
8075 poonam 20 0 407236 98308 9112 S 1.3 1.2 2:42.54 plugin_host

$ uptime 00:08:07 up 5:36, 1 user, load average: 0.84, 0.78, 0.78

$ cat /proc/loadavg 0.96 0.82 0.79 1/1269 10197

CPU load average on the basis of number of CPU

Let’s say we have load averages below:

23:16:49 up 10:49, 5 user, load average: 1.00, 0.40, 3.35

On a single core system this would mean:
  • The CPU was fully (100%) utilized on average; 1 processes was running on the CPU (1.00) over the last 1 minute.

  • The CPU was idle by 60% on average; no processes were waiting for CPU time (0.40) over the last 5 minutes.

  • The CPU was overloaded by 235% on average; 2.35 processes were waiting for CPU time (3.35) over the last 15 minutes.

On a dual-core system this would mean:
  • The one CPU was 100% idle on average, one CPU was being used; no processes were waiting for CPU time(1.00) over the last 1 minute.

  • The CPUs were idle by 160% on average; no processes were waiting for CPU time. (0.40) over the last 5 minutes.

  • The CPUs were overloaded by 135% on average; 1.35 processes were waiting for CPU time. (3.35) over the last 15 minutes.

What happens BEFORE Linux Boots up!

The Warm up before the Boot Process

On the ground level boot process starts with loading the operating system (where machine doesn't know anything about operating system) from any of the storage device.
So without wasting time I will get into the deeper level.

On this initial stage we donot have privilege even of the file system. What we have is the BIOS - a collection of software routines that are initially loaded from chip into the memory and initialised when we switch on the computer. BIOS makes some hardware checks to ensure all hardaware componenets are at stable switched on state.

So, now we know that we have something called BIOS that could be of some help.
BIOS cannot load the operating system as a 'file' as we mentioned above that it doesn't know about file system.

BIOS must read specific sectors of data from specific physical location of the disk devices.
BIOS load the OS from the first sector of the disk device. Here we can have multiple disk devices that may confuse BIOS to which device it should read from.

CPU cannot differentiate between code and data, for CPU both are instructions.
Here comes the magic number which is a unsophisticated way of BIOS to determine the boot sector.
BIOS loops through each disk device, read the boot sector into memory and search for the magic number which is 0xaa55 and instructs CPU to begin executing the first boot sector it finds that ends with the magic number.

My Art Gallery

Drawing1 April 24, 2018 and it all began…

Drawing2 April 25, 2018 mornings started like this…

Drawing3 and this one April 26 2018…

Drawing4 April 27 2018 …

Drawing5 May 1st 2018 another one to present somebody…

Drawing6 May 2nd 2018 was also awesome…

Drawing7 May 5th 2018 with some break now…

Drawing8 October 07 2018 and busy again with some goals….

Drawing9 August 05 2019 and I am back!

dream.jpeg August 07 2019 and Dreaming about someone…

imagination.jpeg August 09 2019 Just the imagination..

perfect_together.jpeg August 10 2019 Imperfections around but perfect together..

grandpa.jpg August 10 2019 grandpa :-)

kashmir.jpg August 12 2019 A view of Kashmir… (use of water color)

How to setup Mesos, Marathon, Zookeeper and Docker

Mesos

  • is open source cluster manager, It provides resource isolation and sharing across distributed applications.
  • Mesos consists of a master daemon that manages slave daemons running on each cluster node. Mesos frameworks are applications that run on Mesos and run tasks on these slaves
  • Mesos uses a two-level scheduling mechanism where resource offers are made to frameworks. The Mesos master node decides how many resources to offer each framework, while each framework determines the resources it accepts and what application to execute on those resources. For more insight refer this: Mesos Architecture and Overview

Marathon

Zookeeper

  • ZooKeeper is a distributed co-ordination service to manage large set of hosts. Co-ordinating and managing a service in a distributed environment is solved by ZooKeeper with its simple architecture and API. 
  • If the Mesos master is unavailable, existing tasks can continue to execute, but new resources cannot be allocated and new tasks cannot be launched. To reduce the chance of this situation occurring, Mesos has a high-availability mode that uses multiple Mesos masters: one active master (called the leader or leading master) and several backups in case it fails. The masters elect the leader, with Apache ZooKeeper both coordinating the election and handling leader detection by masters, agents, and scheduler drivers. For more insight refer this: Zookeeper Architecture and Overview

Master Nodes Setup

  1. Package Installation
    • Highly-available clusters will typically have multiple master nodes and any number of slave nodes. Each master node runs Apache Mesos, Marathon and ZooKeeper (to provide leader  election).
    • Setup repositories:
      • The easiest way to install Mesos is via the GitHub repositories.Mesosphere has official package repositories which connect directly to the native package management tools of your favorite Linux distribution — namely apt-get and yum — to install Mesos on top of the most common Linux distributions.
        1. Commands for Ubuntu
        • Setup
          sudo apt-key adv --keyserver hkp://keyserver.ubuntu.com:80 --recv E56151BF DISTRO=$(lsb_release -is | tr '[:upper:]' '[:lower:]') CODENAME=$(lsb_release -cs)
        • Add the repository
          echo "deb https://repos.mesosphere.com/${DISTRO} ${CODENAME} main" | sudo tee /etc/apt/sources.list.d/mesosphere.list sudo apt-get -y update
        • Install
          sudo apt-get -y install mesos marathon
  2. Configuration
    • The Mesosphere package ships with a default configuration. The default configuration includes:
    1. File: /etc/default/mesos
      sets master and slave log dir to /var/log/mesos.
    2. File: /etc/default/mesos-master
      sets port to 5050.
      sets zk to the value in the file /etc/mesos/zk.
    3. File: /etc/default/mesos-slave
      sets master as the value of /etc/mesos/zk
    4. File: /etc/mesos/zk
      sets the ZooKeeper instance to zk://localhost:2181/mesos
    5. File: /etc/mesos-master/work_dir
      sets working_dir to var/lib/mesos
    6. File: /etc/mesos-master/quorum
      sets quorum to 1
      This default configuration allows Mesos to start immediately on a single node.
      • Configure Zookeeper:
    7. Setting ID
      Set /etc/zookeeper/conf/myid to a unique integer between 1 and 255 on each node.The Mesosphere package ships with a default configuration
    8. Server Addresses
      Append the following values to /etc/zookeeper/conf/zoo.cfg on each node, replacing the IP addresses with your own:
      server.1=1.1.1.1:2888:3888
      server.2=2.2.2.2:2888:3888
      server.3=3.3.3.3:2888:3888
    9. Start Zookeeper
      sudo service zookeeper restart
      • Mesos & Marathon
    10. ZooKeeper
      On each node, replacing the IP addresses below with each master’s IP address, set/etc/mesos/zk to:
      zk://1.1.1.1:2181,2.2.2.2:2181,3.3.3.3:2181/mesos
    11. Quorum
      Set /etc/mesos-master/quorum on each master node to a number greater than the number of masters divided by 2. For example, the optimal quorum size for a five node master cluster would be 3. In this case, there are three masters and the quorum size should be set to 2 on each node.
    12. Host name
      In case unable to resolve the hostname of the machine directly, set /etc/mesos-master/hostname to a value that you can resolve.
      For example, an externally accessible IP address or DNS hostname. This will ensure all links from the Mesos console work correctly.
      Also, set this property in /etc/marathon/conf/hostname
    13. Disable mesos-slave service
      sudo service mesos-slave stop
      sudo sh -c "echo manual > /etc/init/mesos-slave.override"
  3. Restart Services
    • Bring up Mesos master
      sudo service mesos-master restart
    • Now restart Marathon
      sudo service marathon restart

Slave Nodes Setup

  1. Package Installation
    • Setup repositories:
      1. Commands for Ubuntu
        • Setup
          sudo apt-key adv --keyserver hkp://keyserver.ubuntu.com:80 --recv E56151BFDISTRO=$(lsb_release -is | tr '[:upper:]' '[:lower:]') CODENAME=$(lsb_release -cs)
        •  Add the repository
          echo "deb https://repos.mesosphere.com/${DISTRO} ${CODENAME} main" | sudo tee /etc/apt/sources.list.d/mesosphere.list
          sudo apt-get -y update
        • Install
          sudo apt-get -y install mesos
  2. Configuration
    • Disable Zookeeper:
    1. If you’re using the Debian or Ubuntu package, ZooKeeper will be pulled in and installed as a dependency automaticallyi.
      sudo service zookeeper stop
      sudo sh -c "echo manual > /etc/init/zookeeper.override"
      • Mesos
        1. ZooKeeper
          On each node, replacing the IP addresses below with each master’s IP address, set/etc/mesos/zk to:
          zk://1.1.1.1:2181,2.2.2.2:2181,3.3.3.3:2181/mesos
        2. Disable mesos-master service
          sudo service mesos-master stop
          sudo sh -c "echo manual > /etc/init/mesos-master.override"
  3. Start Services
    • Restart mesos-slave on each node to use the new configuration:
      sudo service mesos-slave restart
  4. Verify Installation
    • If the packages were installed and configured correctly, you should be able to access the Mesos console at https://<master-ip>:5050 and the Marathon console at https://<master-ip>:8080 (where  is any of the master IP addresses).

Docker

  • Docker is an open platform for developing, shipping, and running applications. Docker is designed to deliver your applications faster. With Docker you can separate your applications from  your infrastructure and treat your infrastructure like a managed application.
  • Docker helps you ship code faster, test faster, deploy faster, and shorten the cycle between writing code and running code. For more insight refer this: Docker Architecture and Overview
  • These instructions are intended for installing Docker on Ubuntu. Docker’s APT repository contains Docker 1.7.1 and higher. To set APT to use packages from the new repository.

Docker Installation

  1. Update your apt sources
    • Log into your machine as a user with sudo or root privileges.
    • Open a terminal window.
    • Update package information, ensure that APT works with the https method, and that CA certificates are installed.
      sudo apt-get update
      sudo apt-get install apt-transport-https ca-certificates
    • Add the new GPG key sudo apt-key adv --keyserver hkp://p80.pool.sks-keyservers.net:80 --recv-keys 58118E89F3A912897C070ADBF76221572C52609D
    • Open the /etc/apt/sources.list.d/docker.list file in your favorite editor.
    • If the file doesn’t exist, create it.
    • Remove any existing entries.
    • Add an entry for your Ubuntu operating system.
      deb https://apt.dockerproject.org/repo ubuntu-trusty main
    • Save and close the /etc/apt/sources.list.d/docker.list file.
    • Update the APT package index.
      sudo apt-get update
    • Purge the old repo if it exists.
      sudo apt-get purge lxc-docker
    • Verify that APT is pulling from the right repository.
      apt-cache policy docker-engine
    • From now on when you run apt-get upgrade, APT pulls from the new repository.
  2. Prerequisites by Ubuntu Version
    • For Ubuntu Trusty, Wily, and Xenial, it’s recommended to install the linux-image-extra kernel package. Thelinux-image-extra package allows you use the aufs storage driver.
      To install the linux-image-extra package for your kernel version:
    1. Open a terminal on your Ubuntu host.
    2. Update your package manager.
      sudo apt-get update
    3. Install the recommended package.
      sudo apt-get install linux-image-extra-$(uname -r)
    4. Go ahead and install Docker.
      If you are installing on Ubuntu 14.04 or 12.04, apparmor is required. You can install it using: apt-get install apparmor.
  3. Install
    • Make sure you have installed the prerequisites for your Ubuntu version.Then, install Docker using the following:
    1. Log into your Ubuntu installation as a user with sudo privileges.
    2. Update your APT package index.
      sudo apt-get update
    3. Install Docker.
      sudo apt-get install docker-engine
    4. Start the docker daemon.
      sudo service docker start
    5. Verify docker is installed correctly.
      sudo docker run hello-world
      This command downloads a test image and runs it in a container. When the container runs, it prints an informational message. Then, it exits.
  4. Create a Docker group
    • The docker daemon binds to a Unix socket instead of a TCP port. By default that Unix socket is owned by the user root and other users can access it with sudo. For this reason, docker daemon always runs as the rootuser.
      To avoid having to use sudo when you use the docker command, create a Unix group called docker and add users to it. When the docker daemon starts, it makes the ownership of the Unix socket read/writable by thedocker group.
    • To create the docker group and add your user:
    1. Log into Ubuntu as a user with sudo privileges.
      This procedure assumes you log in as the ubuntu user.
    2. Create the docker group.
      sudo groupadd docker
    3. Add your user to docker group.
      sudo usermod -aG docker ubuntu
    4. Log out and log back in.
      This ensures your user is running with the correct permissions.
    5. Verify your work by running docker without sudo.
      docker run hello-world
    6. If this fails with a message similar to this:
      Cannot connect to the Docker daemon. Is ‘docker daemon’ running on this host?
      Check that the DOCKER_HOST environment variable is not set for your shell. If it is, unset it.
      • Upgrade Docker
    7. To install the latest version of Docker with apt-get:
      sudo apt-get upgrade docker-engine
      • Uninstall Docker
    8. To uninstall the Docker package:
      sudo apt-get purge docker-engine
    9. To uninstall the Docker package and dependencies that are no longer needed:
      sudo apt-get autoremove --purge docker-engine
    10. To delete all images, containers, and volumes or user created configuration files on your host run the following command:
      rm -rf /var/lib/docker

Deploying a container within the Architecture

  1. Deployment with script:
    • Create a small json file which will contain app information to be deployed:
      Eg: definition.json
      {
      "container": {
      "type": "DOCKER”,
      "docker": {
      "image": "superguenter/demo-app”
      }
      },
      "cmd": "python -m SimpleHTTPServer $PORT”,
      "id": "demo”,
      "cpus": 0.01,
      "mem": 256,
      "ports": [3000]
      }
    • Now to deploy the app below is the python code:
      import requests
      import json
      import pprint
      url = "https://localhost:8080/v2/apps"
      res = requests.post( url, data=open('/path/to/json/file/definition.json','rb'), headers={'Content-Type': 'application/json'})
      json_data = json.loads(res.text)
      pp = pprint.PrettyPrinter(indent=4)
      pp.pprint (json_data)
  2. Deployment through dashboard:
    • Login to dashboard Localhost:8080 marathon is running on 8080.
    • Click on the createApplication
    • Enter the ID (ID should be unique), allocate the CPU, memory usuage as required.
    • Now, go to DockerContainer: Provide the image name that you have created.
    • Click on Create Application
    • You should be able to see the image name with status as Running/Delayed/Waiting.
    • Running refers: Success
    • Delayed refers:  Failed
    • Waiting refers:  Waiting to be started
  3. Deployment with  Rest API:
    • Execute the following command in the server. Make sure you have provided the required components correctly in the json file.
      curl -X POST -H "Content-Type: application/json" https://localhost:8080/v2/apps [email protected]

Docker Vs VirtualMachine

Explaination Of the Architecture

Docker

  • An image is an executable package that includes everything needed to run an application–the code, a runtime, libraries, environment variables, and configuration files.

  • A container is launched by running an image.

  • A container is a runtime instance of an image–what the image becomes in memory when executed (that is, an image with state, or a user process).

Virtual Machine

  • A virtual Machine is an image of operating system running on Hypervisor over host operating system.
Comparision Basis Docker Virtual machine
Architecture Docker Virtual Machine
Build Only Binaries and libraries of OS over which services run Image of the entire OS
Virtualization OS level virtualization by abstracting user space Hardware Virtualization
Processing boundaries Container have private space for processing, can execute commands as root Virtual Box have confined space for processing and can execue command as user
kernel boundaries Container share host sytstem kernel Virtual Box share host system kernel with Guest Operating System with Hypervisor

Simple SMTP Server with Python

You really want to design a simple mail server in python then here is the way you can do that.

This post gives the idea, architecture and implementation of a simple SMTP server in python, where a flask api is used to initialise and start the server, client can use the apis to play around with different type of requests, and send the mail to the server started by api using any of the way to send email(here a small python script client.py to send mail).

Explaination Of the Architecture

We have a Flask App which gives api to do the following tasks:

  • Initialise Log location.
  • Create DB.
  • Start-Server.
  • Get emails received by a particular id.
  • Get emails received after a particular time.

We have SMTP server implemented using python smtp library which does the following:

  • Receives email from clients.
  • Stores emails in database.

DataBase store, we are using sqlite db store:

  • Stores the email received by Smtp server

Client:

  • Uses Flask Apis to perform the requests.
  • Send email to the server.

Architecture Of SMTP server

Architecture

You can find the code in the github location: https://github.com/agrawalpoonam/smtpapp